

How to Dial In Espresso: A Step-by-Step Guide for Beginners
A shot of espresso takes about 25 to 30 seconds to pull, but getting those seconds right can take new owners weeks of guesswork. That frustration is usually not a skill problem. It is a process problem. Once you understand what dialing in actually measures, most of the mystery disappears.
This guide walks through how to dial in espresso: a step-by-step guide for beginners that treats the process as a simple feedback loop, not a secret technique reserved for professional baristas. You do not need rare beans, a commercial machine, or years of practice to pull better shots. You need a scale, a reliable recipe, and a willingness to change one thing at a time.
Key Takeaways
- Dialing in means adjusting grind size, dose, and time until a specific recipe tastes balanced with your beans and machine.
- Start with a 1:2 brew ratio, such as 18 grams in and 36 grams out, in roughly 25 to 30 seconds, then adjust from there.
- Change only one variable at a time so you know what actually caused the difference.
- Time is a diagnostic clue, not a rule. Taste is the final judge of a good shot.
- Good espresso is achievable with mainstream semi-automatic machines and grinders. Expensive gear is not a requirement for better espresso at home.
What Dialing In Espresso Actually Means
“Dialing in” means adjusting your grinder and recipe until the shot coming out of your machine tastes balanced, not sour and not bitter. It is not a one-time setup. You will re-dial every time you open a new bag of beans, because roast level, bean density, and freshness all change how fast water flows through the grounds.
Three numbers drive the whole process:
- Dose, the dry weight of ground coffee in the portafilter basket, measured in grams.
- Yield, the weight of liquid espresso in the cup, also in grams.
- Time, how long the pump runs, from the moment you start the shot to when you stop it.
Weighing the yield matters more than it might seem. Crema and bubbles make volume measurements unreliable, so two shots that look the same size in a cup can have very different weights. A kitchen or espresso scale accurate to 0.1 grams removes that guesswork entirely.
If you are still deciding on equipment, it helps to understand how machine and grinder pairing affects how forgiving or fussy this process will be. A capable grinder with precise adjustment will almost always matter more to your results than a pricier machine.
The Starting Recipe: Your 1:2 Ratio Baseline
Most current beginner guidance recommends starting with an 18-gram dose and a 36-gram yield, a 1:2 ratio, pulled in about 25 to 30 seconds. This is a sensible starting point, not a universal law. Some beans and machines will taste better slightly outside that window, and that is fine.
Here is the basic numeric target for your first attempts:
| Variable | Starting Point |
|---|---|
| Dose (dry coffee) | 18 grams |
| Yield (liquid espresso) | 36 grams |
| Shot time | 25-30 seconds |
| Water temperature | Set by machine, usually 195-205°F |
Think of this recipe as a scaffold. Once you can repeat it consistently across three shots in a row, you have a stable baseline to adjust from.
How to Dial In Espresso: A Step-by-Step Guide for Beginners
This is the practical sequence. Follow it in order and resist the urge to change more than one thing per shot.
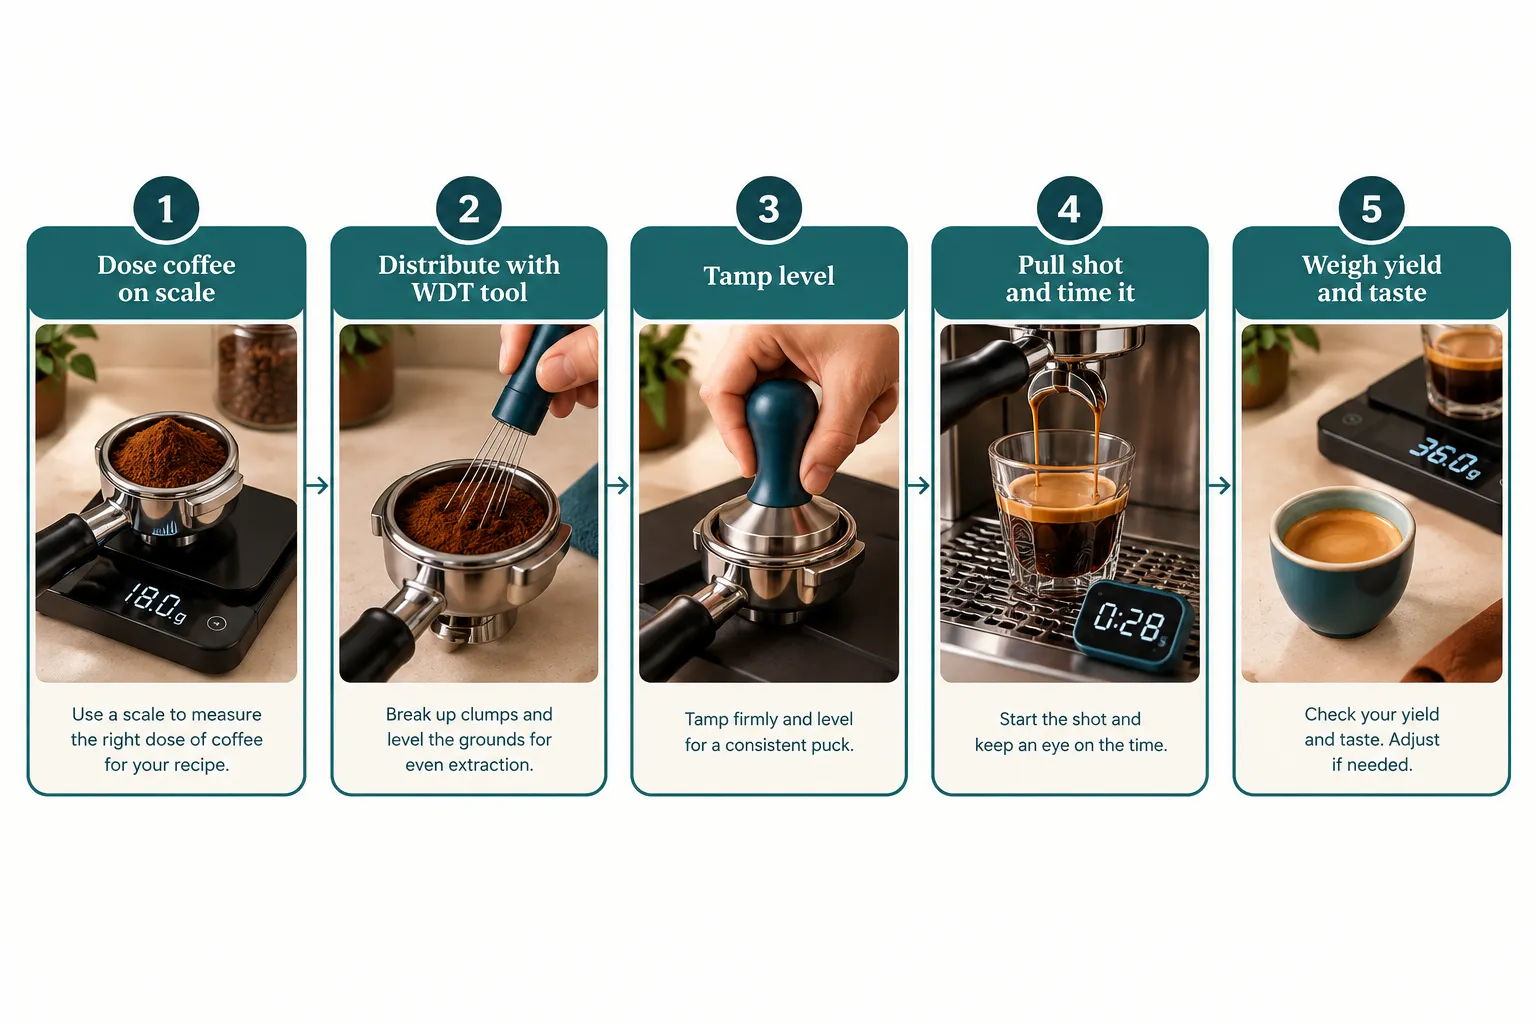
- Weigh your dose. Grind 18 grams of coffee directly into your portafilter basket on a scale.
- Distribute the grounds. Use a distribution tool or a simple WDT (Weiss Distribution Technique) stir tool, which is just a set of fine needles used to break up clumps before tamping. Even distribution helps water flow through the puck evenly instead of carving channels through weak spots.
- Tamp level and firm. You do not need excessive force. A consistent, level tamp matters more than how hard you press.
- Start the shot and the timer together. Place your cup on the scale under the portafilter and start the pump.
- Stop at your target yield. Stop the shot once the scale reads 36 grams, and note how long it took.
- Taste it. This step is not optional. Taste tells you more than the stopwatch ever will.
- Adjust grind size based on time and taste, then repeat.
Reading the Clock Without Worshipping It
A 2026 physics study modeling the coffee puck as a deformable, dissolving porous medium found that swelling, compaction, and changing permeability inside the puck all influence how water moves through it during extraction. In plain terms, the puck is not a static filter. It changes shape while water passes through it, which is part of why identical recipes can still produce different results from shot to shot.
That same research used careful, repeatable technique, an 18.5-gram dose, WDT distribution, consistent tamp pressure, and a target of about 37 grams in 32 seconds, to get dependable results. The lesson for home users is simple: puck preparation is not cosmetic. It physically changes the structure water flows through.
This is also why a 25-second shot can still taste off if water channeled unevenly through the grounds, and why a shot slightly outside the “normal” time window can still taste great. Treat time as a diagnostic clue once your prep is consistent, not as the goal itself.
Adjusting Grind Size: The One Variable That Matters Most
Once your dose, distribution, and tamp are consistent, grind size is the main lever for fixing shot time and taste.
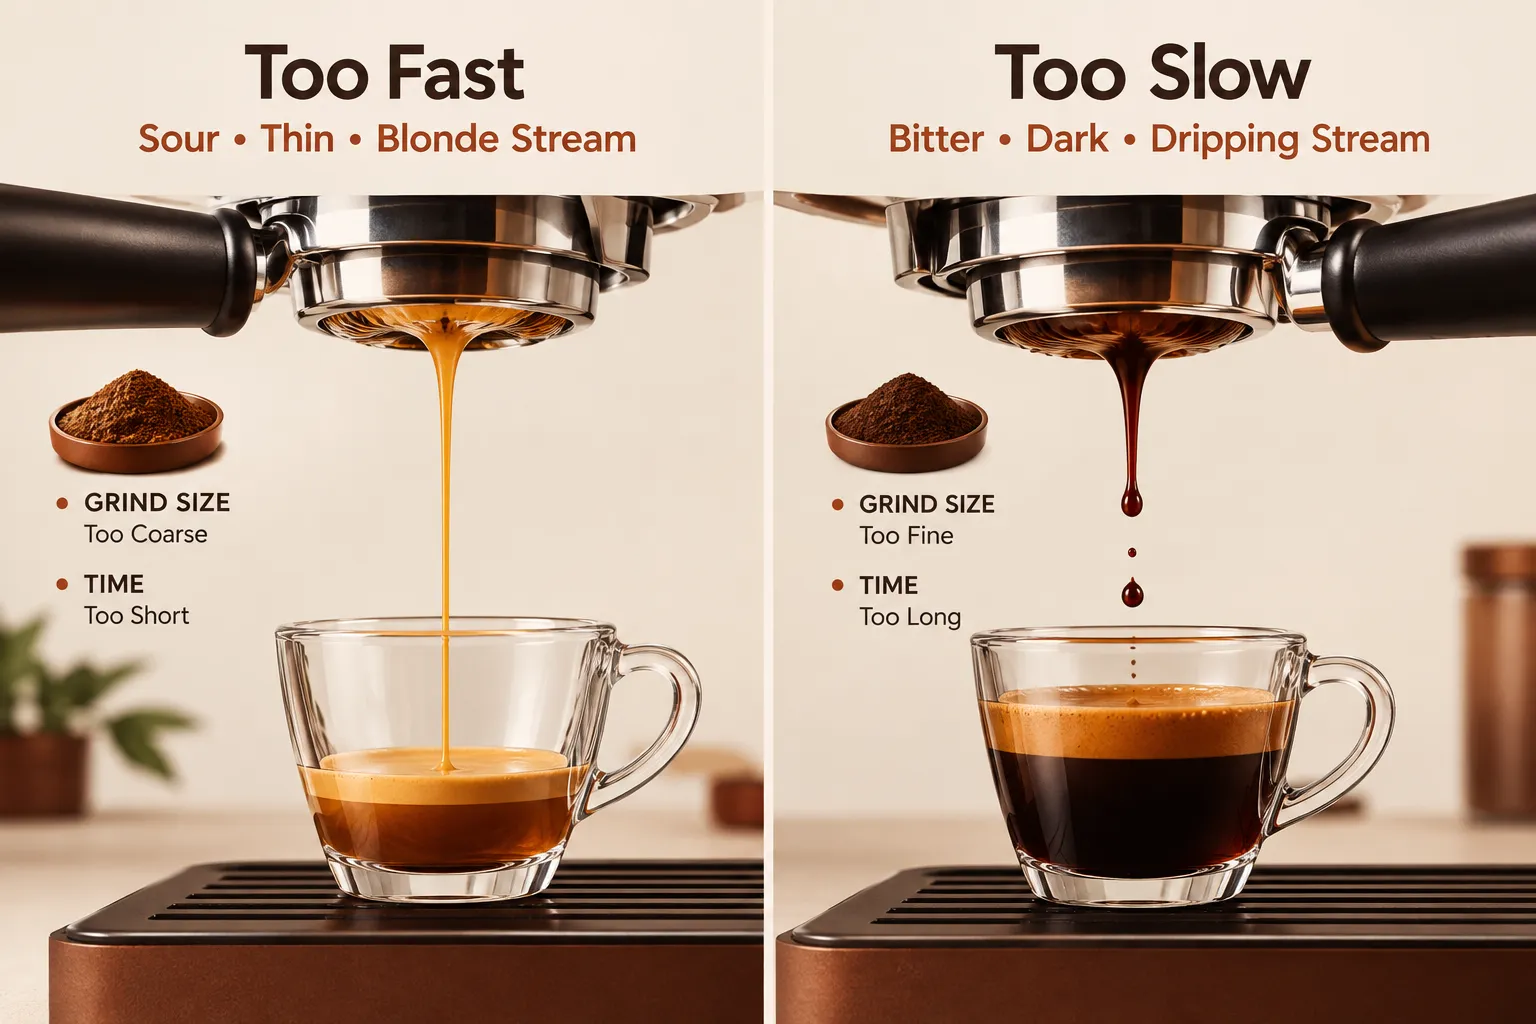
- Shot runs too fast (under 25 seconds) and tastes sour or thin: Grind finer. Water is moving through too quickly to extract enough flavor.
- Shot runs too slow (over 30 seconds) and tastes bitter or harsh: Grind coarser. Water is sitting in contact with the grounds too long.
- Shot sputters or drips unevenly even at a fine setting: You may have hit a point of diminishing returns. Research summarized from 2020 extraction studies found that extremely fine grinding can actually increase uneven flow rather than improve extraction. If this happens, try backing off slightly coarser instead of pushing finer.
Make small adjustments. On most grinders, a tiny click or fraction of a turn is enough to shift shot time by several seconds. Change grind size, pull one shot, and evaluate before changing anything else. For a deeper breakdown of this process, see our dialing in and technique guidance.
When to Adjust Dose or Temperature Instead
If grind size alone is not giving you a shot you like, dose and temperature are the next variables to try, but only after timing is repeatable across three shots with your current recipe.
- Raising dose slightly (for example, 18 grams to 19 grams) can add body and intensity, but it also changes how the puck resists water flow, so expect to re-check your grind afterward.
- Water temperature is usually fixed by the machine, though some models allow adjustment. Lighter roasts generally benefit from slightly higher temperatures; darker roasts often taste better slightly cooler.
Avoid stacking multiple changes in one shot. If you change dose and grind and temperature together and the shot tastes better, you will not know which change actually helped next time you switch beans.
Common Espresso Problems and Where They Usually Start
Troubleshooting works best moving from the most likely cause to the least likely one.
Shot tastes sour: Usually under-extraction. Check grind size first (too coarse), then dose (too low), then confirm your machine reached full temperature before pulling. Our dedicated piece on why espresso tastes sour walks through this in more detail.
Shot tastes bitter or harsh: Usually over-extraction, a grind that is too fine, a shot that ran too long, or stale, overly dark beans.
Shot channels or sputters: Check distribution before tamping. Clumpy grounds create weak spots where water rushes through, bypassing the rest of the puck.
Inconsistent results day to day: Check your grinder’s dosing consistency, bean freshness, and whether beans have had time to rest after roasting. Beans used within a day or two of roasting can behave very differently than beans rested for a week or more.
For a broader troubleshooting reference once you have ruled out the basics, visit our troubleshooting category.
Equipment Considerations That Affect Dialing In
You do not need commercial gear to dial in good espresso at home, but your equipment does shape how forgiving the process is.
Grinders deserve more attention than most beginners expect. A grinder with stepless adjustment gives you finer control over small changes, which matters because espresso is sensitive to grind size in ways drip coffee is not. Recent entries in this space, like Fellow’s Opus 2, a 48mm conical burr grinder with stepless adjustment aimed specifically at espresso-level precision, illustrate a broader trend: affordable home grinders are increasingly built around giving beginners finer dial-in control rather than general-purpose brewing. If you are choosing your first setup, our guide to choosing the right grinder covers this tradeoff in more depth.
Machines matter less for dialing in than people assume, as long as the machine holds stable temperature and pressure. Mainstream semi-automatic machines, including Breville’s Bambino and Barista lines, the Gaggia Classic, Rancilio Silvia, and comparable Lelit and Profitec models, all support a proper dial-in process. The meaningful differences between them usually show up in workflow, build quality, and how easy they are to live with daily, not in whether you can get a good shot out of them.
On the higher end of the industry, commercial innovation is heading toward more automation that still aims for traditional espresso quality, as seen in connected super-automatic systems built for cafes and hospitality settings. That trend is not really relevant to home dial-in technique, but it is a useful reminder that even professional-grade engineering is still chasing the same consistency problem home users deal with at a smaller scale.
If you are still shopping, our buying guides section breaks down how to choose the right espresso machine for your budget and workflow, and our reviews and comparisons coverage looks at specific models side by side.
Maintenance Habits That Keep Your Dial-In Stable
A dial-in that worked perfectly last week can drift if your equipment or water changes.
- Clean your portafilter basket and shower screen regularly. Built-up coffee oils change flow resistance over time.
- Watch your water. Hard water causes scale buildup inside your machine, which affects heating and flow consistency. Soft or overly filtered water can also pull flavor compounds unevenly. Our maintenance and water guidance covers practical filtering options.
- Check your grinder burrs periodically. Worn burrs grind less consistently, which shows up as unstable shot times even when your technique hasn’t changed.
Treating maintenance as part of the dial-in process, rather than a separate chore, will save you from re-diagnosing problems that are really just equipment upkeep.
FAQ
How long does dialing in espresso usually take? For a new bag of beans, expect three to six shots to land on a recipe you like, assuming your dose and distribution are already consistent. New equipment or a big change in bean roast level can take longer.
Do I need a scale to dial in espresso? Yes, practically speaking. Weighing dose and yield removes the guesswork that comes from judging cup volume, which is unreliable because of crema.
Why does my shot time keep changing even though I haven’t touched the grinder? Bean freshness, humidity, and even small dosing differences can shift shot time slightly. Small day-to-day variation is normal; large swings usually point to inconsistent dosing or grinder wear.
Is a 1:2 ratio the only correct recipe? No. It is a reliable starting point. Many home users eventually prefer slightly different ratios based on bean roast and personal taste. Use taste as the final judge once you understand the basics.
Does a more expensive grinder guarantee better dial-in results? Not automatically. It generally offers finer adjustment and more consistent particle size, which makes small corrections easier. A mid-range, well-maintained grinder can still dial in very good espresso.
What should I change first if my shot tastes off but my recipe looks right on paper? Check puck preparation before touching the grinder. Uneven distribution or an inconsistent tamp can cause channeling that no grind adjustment will fix on its own.
Conclusion
Learning how to dial in espresso: a step-by-step guide for beginners really comes down to patience with a simple loop: measure your dose and yield, time the shot, taste it, and change one variable at a time. There is no secret technique being withheld from home users. The process is mechanical, repeatable, and learnable with ordinary equipment.
Start with the 1:2 ratio, keep your scale running, and let taste override the stopwatch once your prep is consistent. If shots stay stubbornly off after you’ve worked through grind, dose, and distribution, it is worth checking your grinder consistency and water quality before assuming you need new equipment. For more on building out a dependable setup, browse our accessories and setup resources or explore the full blog for troubleshooting and technique guides as you keep refining your results.
Meta Title: How to Dial In Espresso: A Step-by-Step Guide for Beginners
Meta Description: Learn how to dial in espresso with a clear beginner process covering dose, yield, grind size, troubleshooting, and practical home espresso technique.
espresso dialing in, home espresso, espresso troubleshooting, espresso grinder, brew ratio, espresso extraction, beginner barista, espresso machine maintenance, grind size, espresso recipe, home barista, semi-automatic espresso machine
Contributing writer at Espresso Savvy.
